
Description
Under The Weather is a powerful yet simple plugin that displays location-specific weather forecasts on your WordPress site. Featuring a dedicated “Under The Weather Forecast” block to add and customize weather widgets directly in the WordPress editor for a seamless workflow.
With performance in mind, Under The Weather uses a server-side caching system (WordPress Transients) to minimize API calls and ensure your site remains fast. Under The Weather is completely “vanilla” on the front-end, meaning it does not rely on jQuery or any other JavaScript frameworks. Built with modern security practices, including input validation, CSRF protection, and optional rate limiting to protect your site and API quota.
This plugin is ideal for travel blogs, outdoor activity sites, or any website that needs to display weather conditions for specific locations without the bloat of heavy, multi-dependency plugins.
Key Features:
-
Easy Integration: Add weather widgets in the WordPress editor by using a dedicated weather block, an
[under_the_weather]shortcode, or by placing a simple<div>with data attributes anywhere on your site. -
Beautiful Display Options: Designed to look stunning on any site. Choose from 4 different visual options:
- The Default OpenWeather images
- A Crisp Weather Icons font
- 2 Animated SVG icon sets
-
Styled to Match Your Site: Seamlessly fit the widget into any site design using the Light Mode for white and light backgrounds or toggle on the Dark Mode for nicely contrasted text on dark backgrounds. Apply custom hex colors to the “Weather Icons Font” with the Color Picker for a truly bespoke integration.
-
Fully Customizable Layouts: Choose whether the widget’s main focal point highlights the live current conditions or today’s high and low temperatures. Build out the widget to meet your goals, from a compact day-of weather widget to a full weather hub, displaying:
- Extended forecasts (up to 6 days)
- “Feels like” temperatures
- Wind speeds and directions
- Active weather alerts
- Sunrise & Sunset Times
-
Visual Performance Report: Monitor your site’s API usage with a bar chart that displays a 7-day history of cached requests versus new calls to the OpenWeather API – a clear look at how the caching system is working to keep your site fast and your API calls low.
-
Smart Caching: All API calls are cached on your server, dramatically reducing calls to the OpenWeather API and speeding up page loads for all users. The plugin includes a configurable cache duration and automatically resets the forecast after midnight in the location’s timezone, ensuring your visitors always see the current day’s weather.
-
Fast Weather Location Lookup: An easy-to-use Coordinate Finder tool located in the settings page and the Block Editor retrieves coordinates by location name worldwide. Generates ready-to-use widget
<div>code from the settings page. Automatically fill coordinates in the block editor. -
Imperial & Metric Units: Display weather in Fahrenheit/mph or Celsius/kph on a per-widget basis.
Performance First: Built for Core Web Vitals
-
Page Speed Optimized: Unlike other popular weather plugins that load hundreds of kilobytes of external libraries, Under The Weather is engineered specifically for speed and SEO, using native script deferral, smart font preloading, conditional asset enqueues, and optional async CSS loading.
-
Zero Dependencies: While other weather plugins force your site to load heavy external libraries like jQuery, Vue.js, or Swiper.js just to show a simple forecast, Under The Weather requires exactly 1 script request, written in pure, vanilla JavaScript. This guarantees faster loading and zero risk of library conflicts.
-
Ultra-Lightweight Footprint: At roughly 10 KB, the JavaScript payload is up to 25x smaller than many other weather widgets for WordPress, without sacrificing features.
-
Zero Layout Shift (CLS): Using an intelligent, dynamic skeleton loading UI and modern CSS containment, the widget claims its vertical space immediately, preventing the page from “jumping” when the weather data arrives, and eliminating Cumulative Layout Shift (CLS) issues that can negatively impact your Core Web Vitals.
-
Smart Server-Side Caching: API requests to OpenWeather are handled safely by your server, not the visitor’s browser. Data is securely cached using WordPress transients to serve lightning-fast results to your visitors while drastically reducing API calls and protecting your OpenWeather quota.
Usage
The Under The Weather plugin offers three ways to add a weather forecast: using the block editor or manually placing a <div> or shortcode.
Using the Block Editor (Recommended)
- Open the post or page where you want to display the weather.
- Click the block inserter icon (+) to add a new block.
- Search for “Under The Weather Forecast” and add the block.
- Configure your location using either:
- Manual entry of coordinates in the block settings sidebar
- The built-in coordinate finder that searches by location name and fills in the coordinates for you
- Choose your preferred units (Imperial/Fahrenheit or Metric/Celsius)
- Publish or update your post – the weather will display automatically!
Manual Placement (Classic Editor & Themes)
To display the weather widget on a post, page, or in a template file, add a simple <div> element with the class weather-widget and the required data attributes.
data-lat: The latitude for the forecast.data-lon: The longitude for the forecast.data-location-name: The city or location name you want to display as the title of the widget. (Beyond its display purpose, the ‘data-location-name’ is also used to create the shared cache key).data-unit(optional): The unit system for temperature and wind speed. Acceptsmetricorimperial. The default unit isimperialif not provided.
Examples:
        <div class="weather-widget"
           data-lat="34.1186"
           data-lon="-118.3004"
           data-location-name="Los Angeles, California">
        </div>
To show the weather for a location in Celsius, you would add data-unit="metric":
        <div class="weather-widget"
           data-lat="48.8566"
           data-lon="2.3522"
           data-location-name="Paris, France"
           data-unit="metric">
        </div>
The plugin’s JavaScript will automatically find this element and populate it with the forecast.
Using the Shortcode (Classic Editor & Widgets)
You can also display the weather by using the [under_the_weather] shortcode. This is ideal for the Classic Editor, text widgets, or other page builders.
Available attributes:
lat: (Required) The latitude for the forecast.lon: (Required) The longitude for the forecast.location_name: (Required) The name to display for the location.unit: (Optional) The unit system. Acceptsmetricorimperial. Defaults toimperial.
Example: [under_the_weather lat="48.8566" lon="2.3522" location_name="Paris, France" unit="metric"]
Configuration
Before you begin, go to openweathermap.org and sign up for an API key and register for the One Call API 3.0 subscription. Paste your API key into the Under the Weather Settings Page.
API & Cache
Cache Expiration Time:
Use the slider to set the maximum time weather data is stored before fetching a new forecast, from 30 minutes to 8 hours.
The plugin also features a smart caching system that automatically ensures the cache expires after midnight in the location’s local timezone. This prevents showing a stale forecast from the previous day, regardless of your slider setting.
For displaying live conditions (using the Primary Display or Extra Details options), a shorter cache time of 1 or 2 hours is recommended.
For displaying only the daily high/low, a longer cache time of 3 or 8 hours effectively reduces API calls.
Widget Display & Style
Tailor the widget to perfectly match your website’s aesthetic and your users’ needs:
Icon & Style Set:
Pick the style that suits you best. Choose between four weather icon options:
* Recognizable Default images (PNGs) provided by OpenWeather.
* Sharp, modern Weather Icons fonts created by Erik Flowers.
* Two Animated SVG icon sets (Fill and Outline) by Bas Milius.
Note: Selecting the icon font will load an additional small CSS file.
Icon Font Color:
Use the color picker to customize the “Weather Icons Font” set to match your theme. This setting only has a visible effect when the “Weather Icons Font” style is selected (it does not impact PNGs or SVGs). If left at the default, the icons will use the gray color specified in the plugin’s stylesheet.
Widget Mode:
The weather widgets are designed to look good on light or dark backgrounds. Select Light Mode when displaying weather widgets on white and light backgrounds. Switch to Dark Mode to display weather widgets on black or dark backgrounds.
Primary Display:
Select whether the main display of the widget shows the Current live temperature or Today’s Forecast (the high and low for the day).
Number of Forecast Days:
Adjust the number of days shown in the extended forecast row, from 2 to 6 days. When set to 0 days, the widget’s forecast area disappears, leaving a compact widget showing the current day’s weather.
Extra Details:
Selecting this option will display ‘Feels Like’ and wind (direction and speed) information beneath the primary display. This setting adds nuance to the current weather conditions display.
Sunrise & Sunset: This setting displays the local sunrise and sunset times for the location, useful for planning outdoor activities. Choose to show the times in a 12-hour (e.g., 6:30 AM) or 24-hour (e.g., 18:30) format.
Weather Alerts: When enabled, the widget will display any active severe weather alerts (e.g., thunderstorm warnings, flood advisories) issued by official authorities for the specified location. This provides critical, at-a-glance information for your visitors.
Display Timestamp:
Indicates the time elapsed since the weather data was last updated from the source. This option helps readers see how recently the weather widget obtained its information.
Display Unit Symbol:
Adds the unit symbol (F or C) next to the main temperature. This option lets you choose whether the widget should include the temperature unit symbol in the primary temperature display.
Advanced Settings
Enable Cache: You can uncheck this box if you would like to use this plugin without the benefit of caching.
Enable Rate Limiting: Check this box to protect your site against excessive API requests from a single IP address. You can set the maximum number of requests per hour (default is 100). This helps prevent malicious traffic from exhausting your API quota.
Asset Loading: For the plugin to function correctly, the Load Plugin CSS and Load Plugin JavaScript boxes should normally remain checked. However, you can uncheck them if you prefer to include the plugin’s CSS and JS files as part of your theme’s own optimized assets.
If you uncheck Load Plugin JavaScript, you can load the Under The Weather scripts manually on select pages by adding the following template tag to your theme files (e.g., footer.php):
        <?php
           if ( function_exists( 'under_the_weather_load_scripts_manually' ) ) {
              under_the_weather_load_scripts_manually();
           }
        ?>
For most users, simply leaving these boxes checked is the best way to use the weather widget.
Async CSS Loading: Enable this option to reduce render-blocking resources for faster initial page loading.
* It is recommended to leave this unchecked if your weather widget is located “above the fold” (near the top of the page) to prevent layout shifting or a flash of unstyled content.
* If you enable async loading, please consider adding a “min-height” rule for “.weather-widget” to your theme’s custom CSS to reserve the widget’s vertical space while the stylesheet loads. Example: .weather-widget{min-height:300px}
Shimmer While Loading: Enabled by default, this visual placeholder provides layout stability before the weather data arrives. Uncheck this box to instead display a clear, transparent widget area before the weather data arrives.
Coordinate Finder
Don’t know the latitude and longitude for your desired location? No problem. The Under The Weather plugin will find coordinates for you.
In the WordPress Block Editor
- Add an “Under The Weather Forecast” block to your post or page.
- Open the Block Settings
- Click the “Find Coordinates by Name” button.
- Type in the name of your location.
- Press “Search.”
- When search results appear, click on your desired location.
- The location’s coordinates will be automatically entered into the latitude and longitude settings for the weather forecast.
In the Plugin Settings Page
- Navigate to Settings > Under The Weather and click on the Coordinate Finder tab.
- Type a location name into the search box (e.g., “Los Angeles, CA”).
- Click the “Find Coordinates” button.
- The tool will display the generated
<div>with the correct coordinates and location name. - Use the “Copy Code” button to copy the ready-to-use widget HTML and paste it into a post, page, or widget.
The tool automatically saves a history of your last 5 searches, which persists between sessions. You can easily copy code from previous searches without having to look them up again.
Performance Report
The Under The Weather plugin includes a Performance Report tab on the settings page (Settings > Under The Weather > Performance Report) to provide clear insight into the plugin’s efficiency and API usage.
-
Average Daily Usage: A daily average pie chart provides a snapshot of how frequently weather data is served from the cache versus making new calls to the OpenWeatherMap One Call API 3.0 (which offers a free tier of 1,000 API calls per day).
-
Last 7 Days of Activity: A 7-day bar chart that displays a more detailed comparison of cached hits versus new calls to the OpenWeather API. This chart includes the current day’s usage, which is not calculated into the daily average.
The performance report demonstrates how the caching system reduces external requests and keeps your site fast. Use this report to fine-tune your Cache Expiration Time and observe the impact on your API call rate.
The report also includes a status indicator that shows whether the optional Rate Limiting feature is currently active. If rate limiting is enabled and requests are being blocked, the raw data table at the bottom of the report will log these events. This can help you identify unusual traffic patterns or potential misuse of your API key.
Credits
- Weather Data: OpenWeather
- Weather Icon Font: Weather Icons by Erik Flowers
- Animated Weather Icons: Meteocons by Bas Milius
- Geocoding & Map Data: Data © OpenStreetMap contributors
- Block Icons: Phosphor
External Services
-
OpenWeatherMap API: This plugin connects to the OpenWeatherMap API to retrieve weather forecast data. To provide weather information, the following data is sent to the service:
-
Location Coordinates: The latitude and longitude provided in the widget settings are sent to fetch the weather for that specific location.
- API Key: Your OpenWeatherMap API key is sent to authenticate the request.
Here are the links to their terms of service and privacy policy:
* Terms of Service: https://openweather.co.uk/storage/app/media/Terms/Openweather_terms_and_conditions_of_sale.pdf
* Privacy Policy: https://openweather.co.uk/privacy-policy
- Nominatim (OpenStreetMap) API: The Coordinate Finder tool sends the location name entered by the administrator to the Nominatim geocoding service to retrieve latitude and longitude coordinates.
Here is the link to their privacy policy:
* Privacy Policy: https://osmfoundation.org/wiki/Privacy_Policy
Screenshots
The weather widget, displaying current conditions with the Weather Icons. 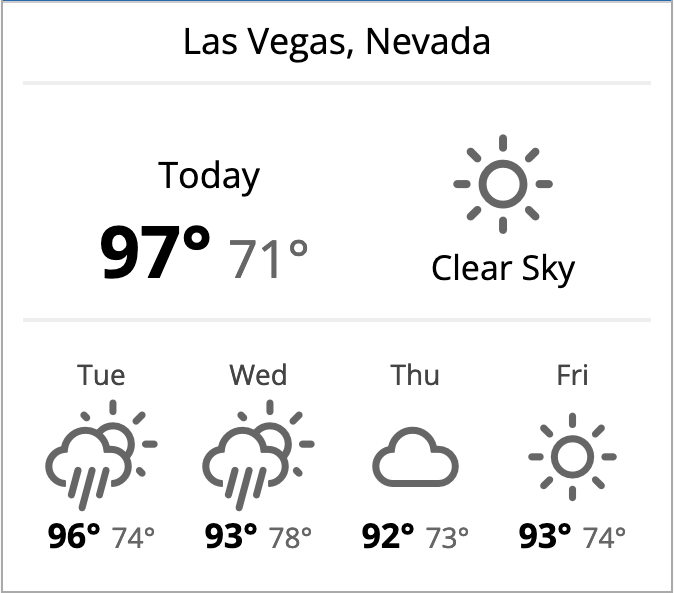
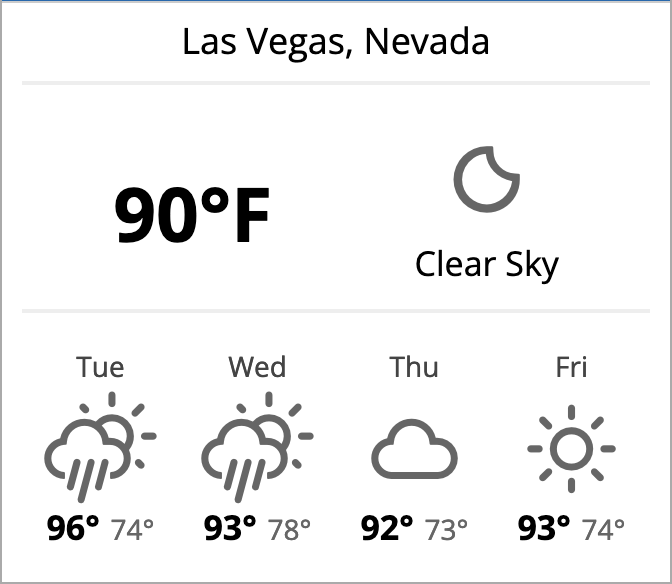
The weather widget, displaying “Today’s Forecast” with the Weather Icons font set. 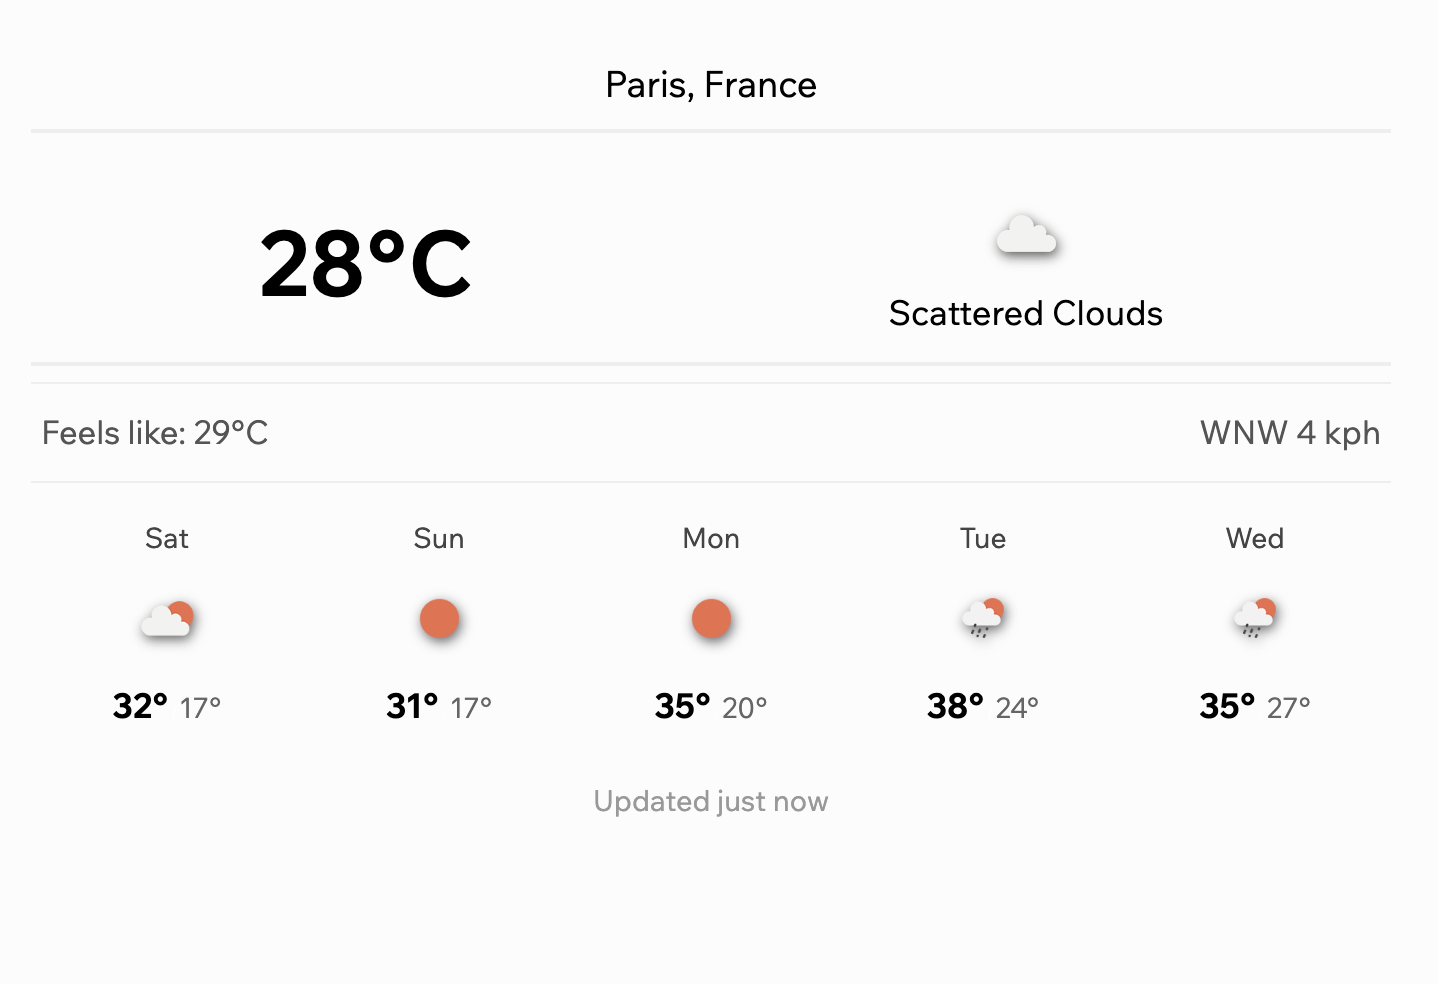
The weather widget, displaying current conditions with default icons (in Celsius) and extra details enabled. 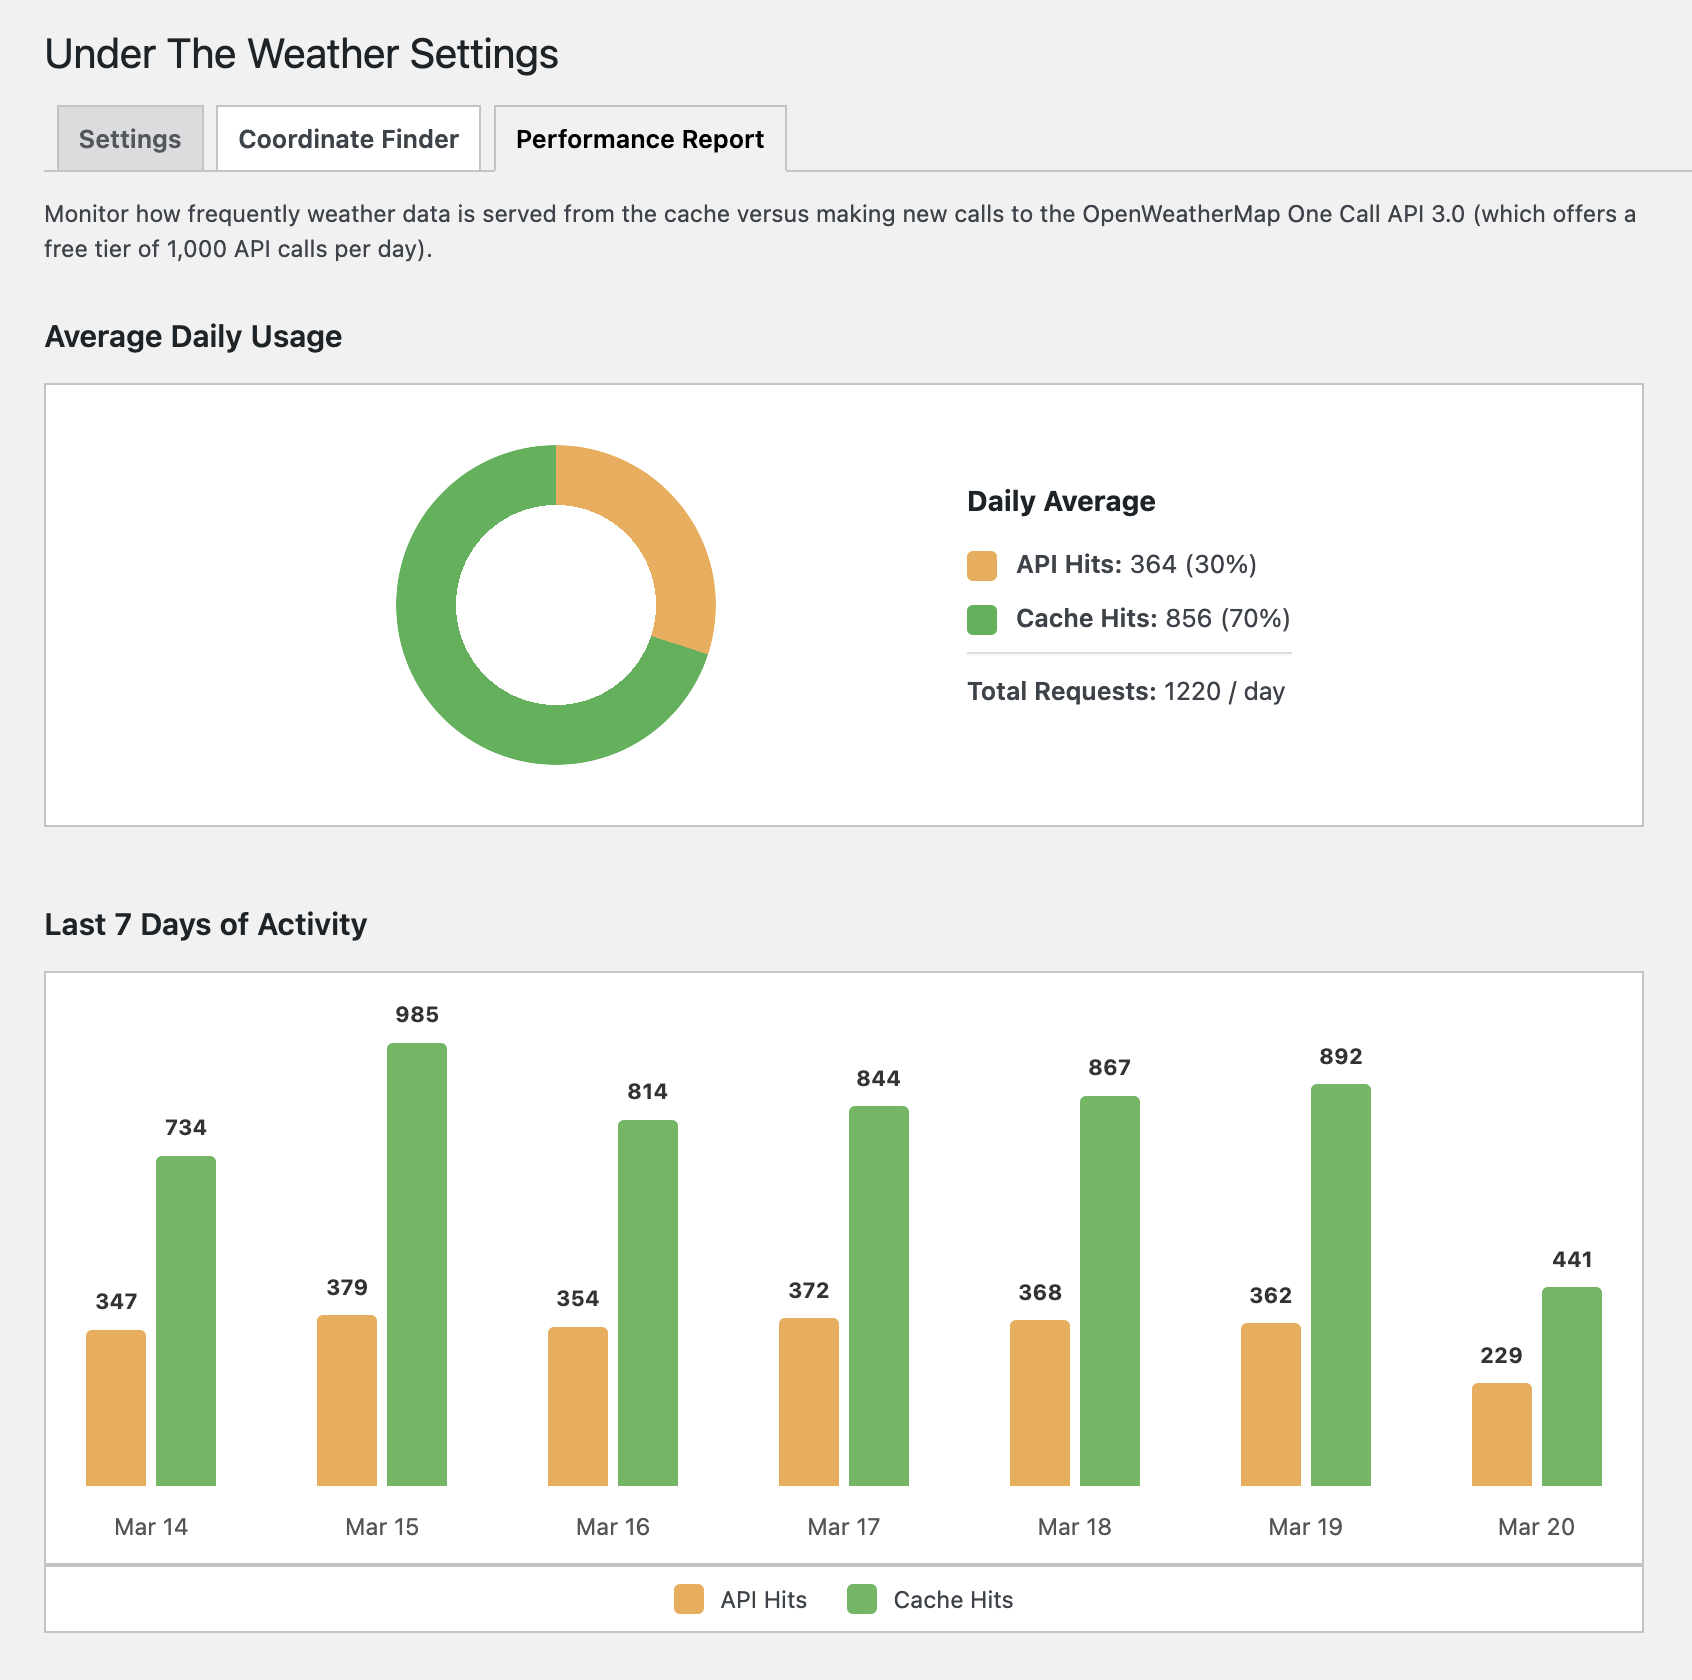
The Under The Weather Performance Report, depicting seven days of information on cached hits vs calls to the OpenWeather API. 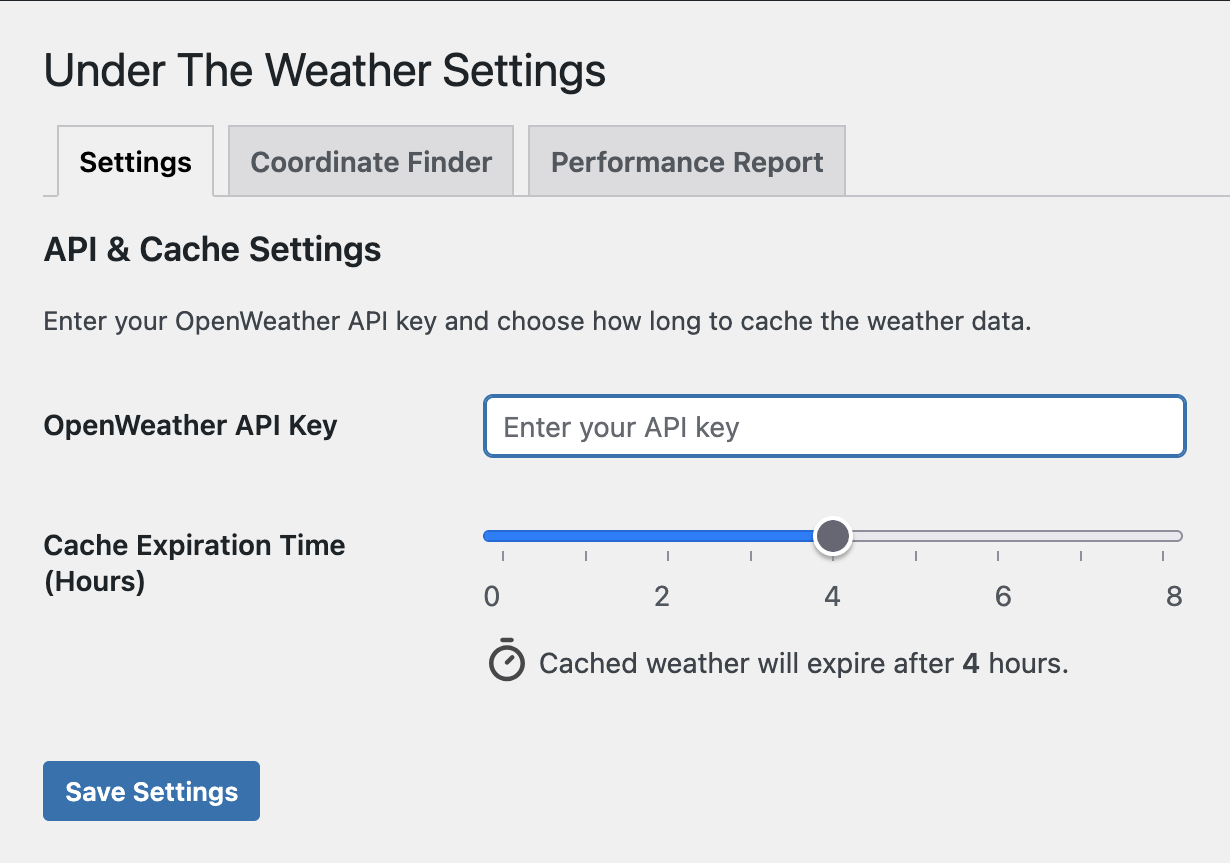
The API & Cache options on the plugin’s settings page. 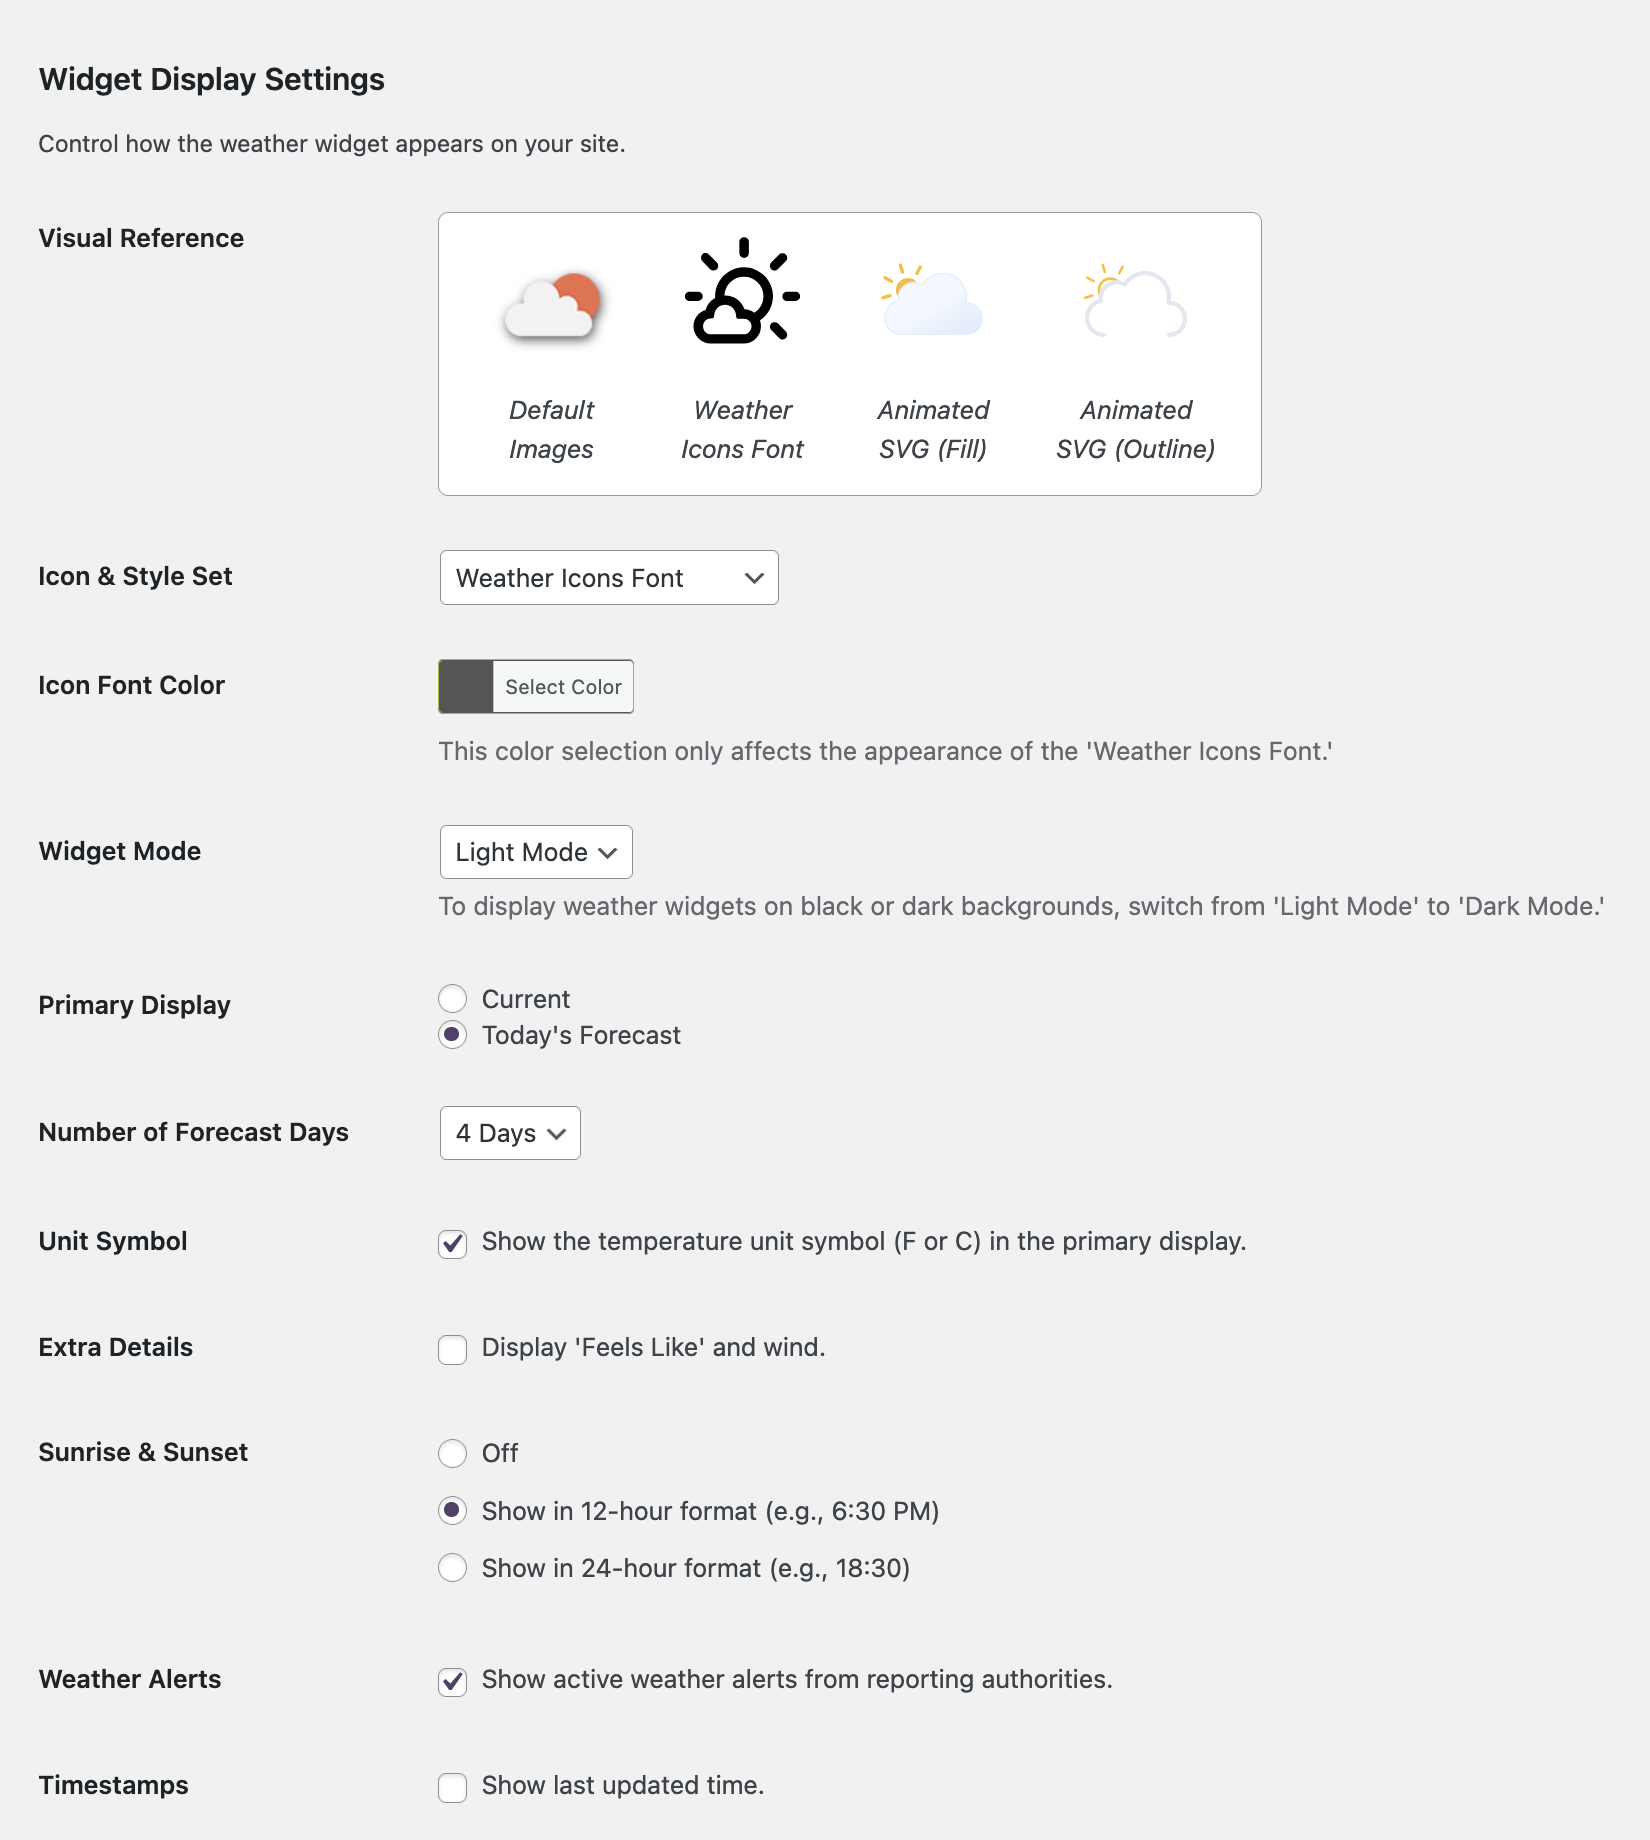
The Widget Display options on the plugin’s settings page. 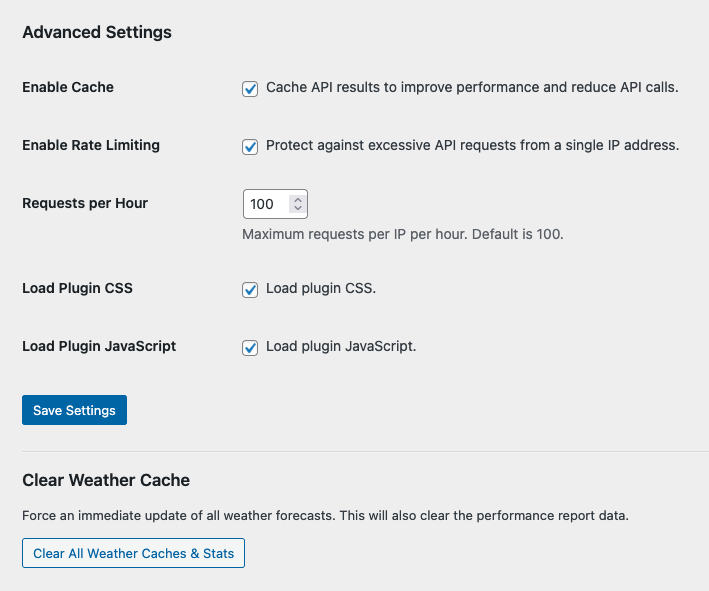
The Advanced Settings options on the plugin’s settings page. 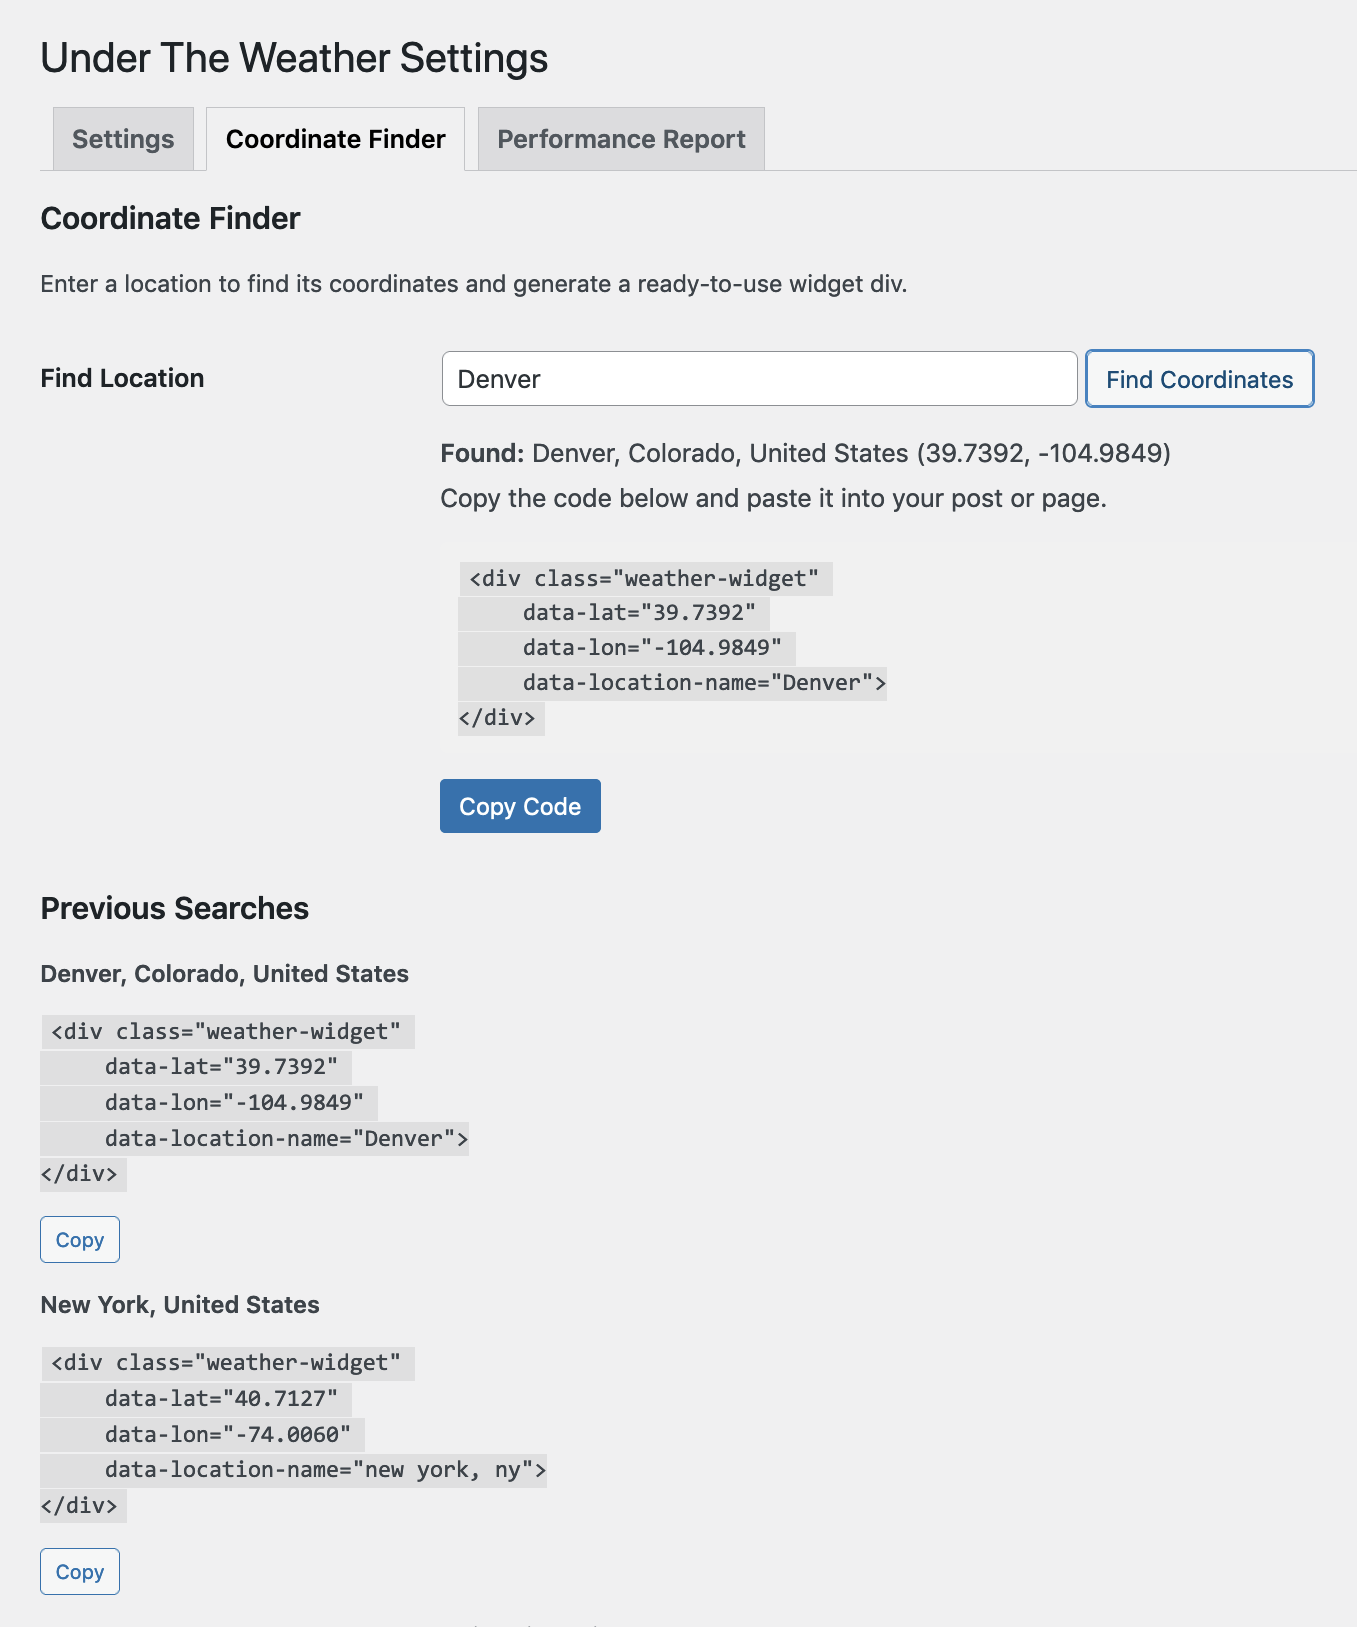
The Coordinate Finder tool, which generates widget code from a location name. 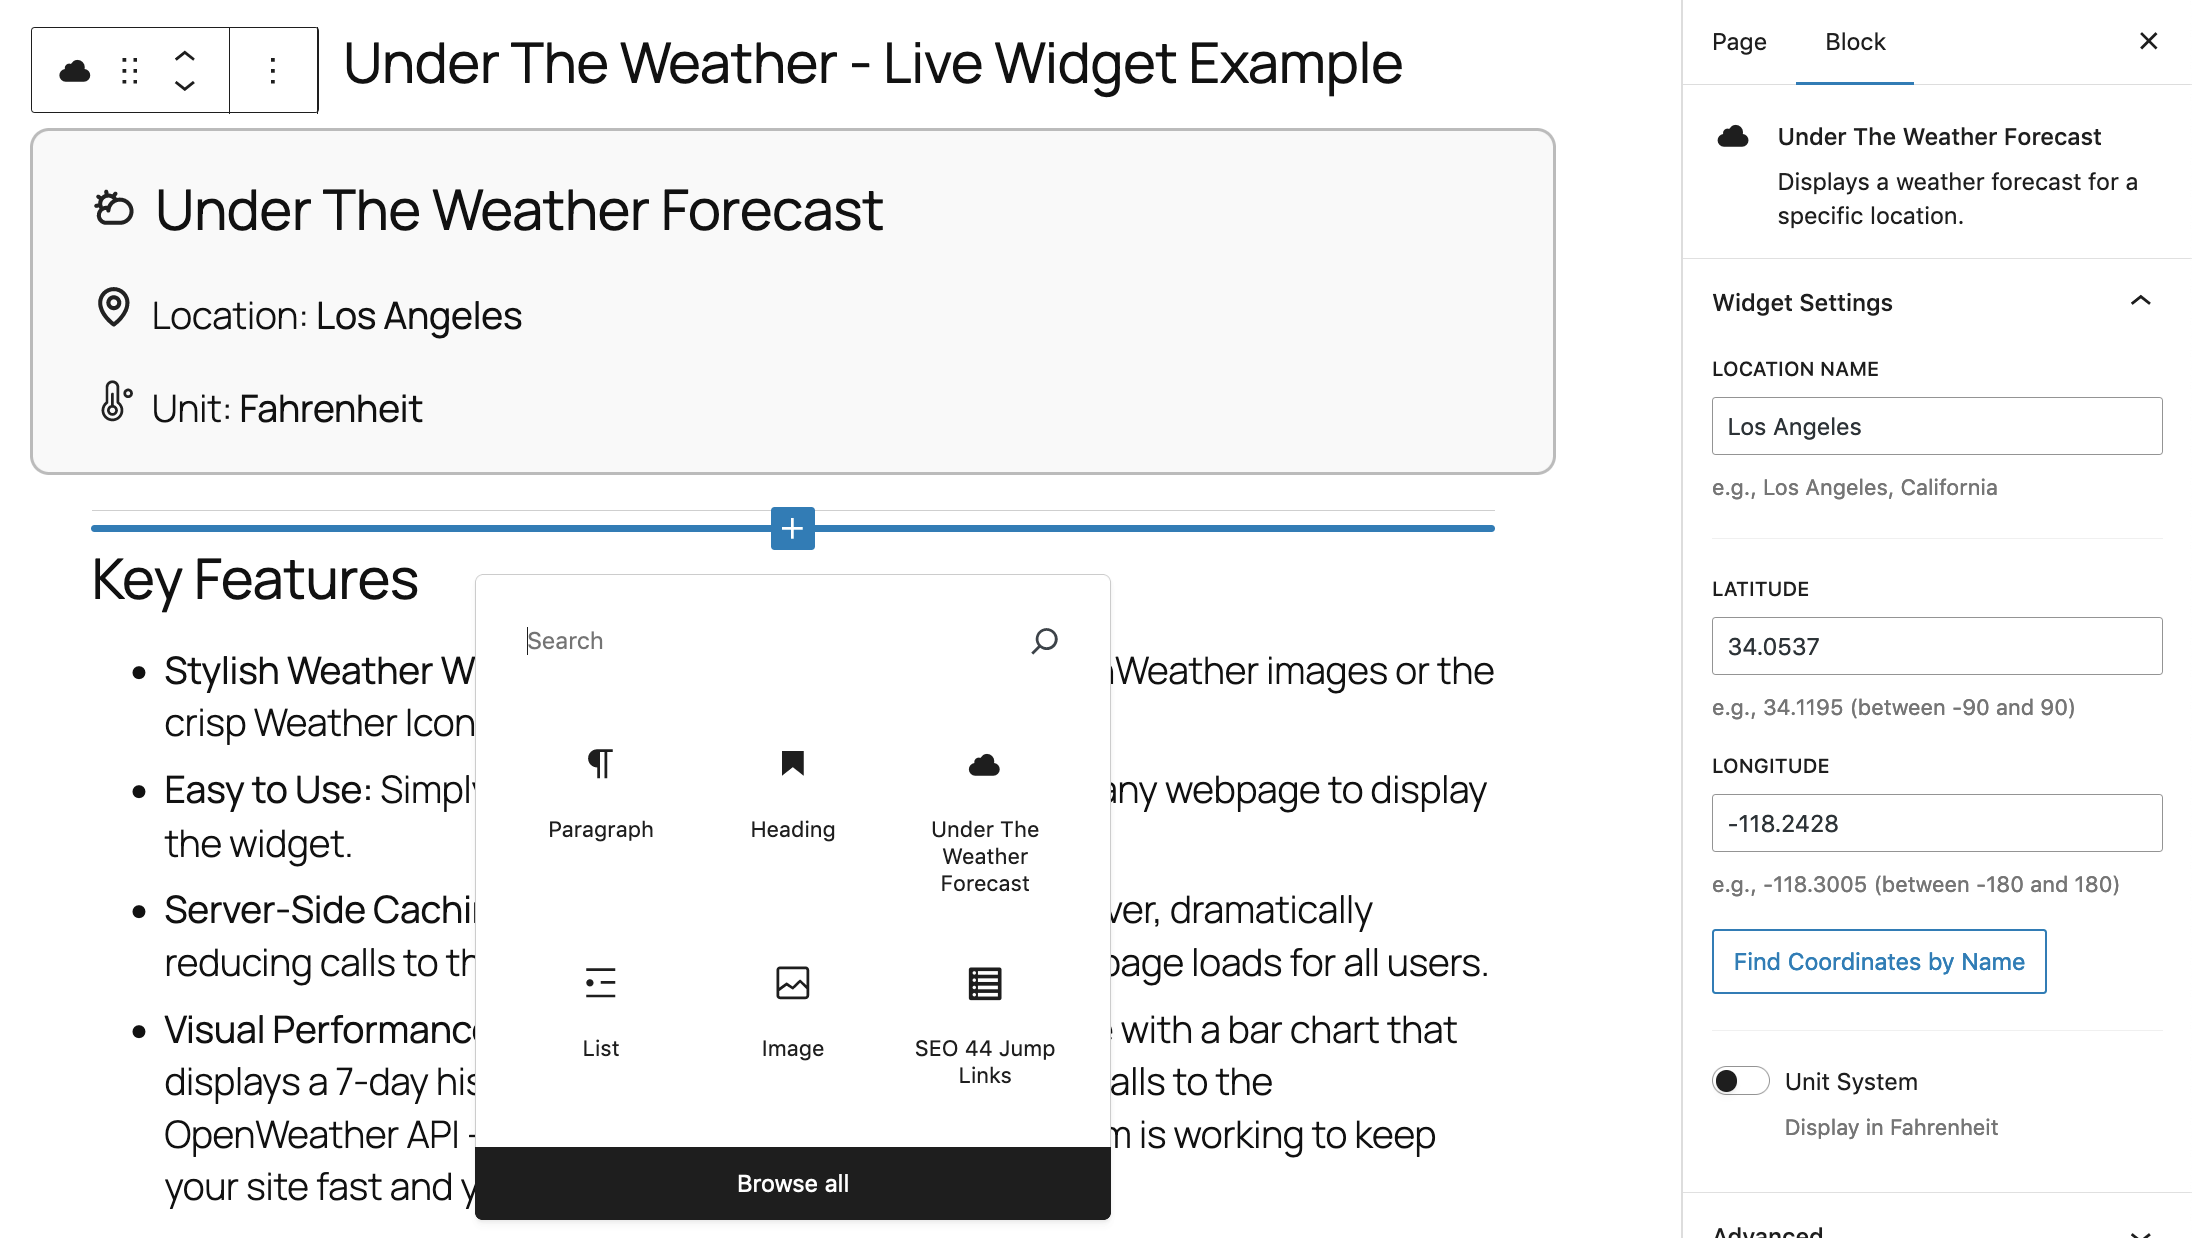
The “Under The Weather Forecast” block in the WordPress editor. 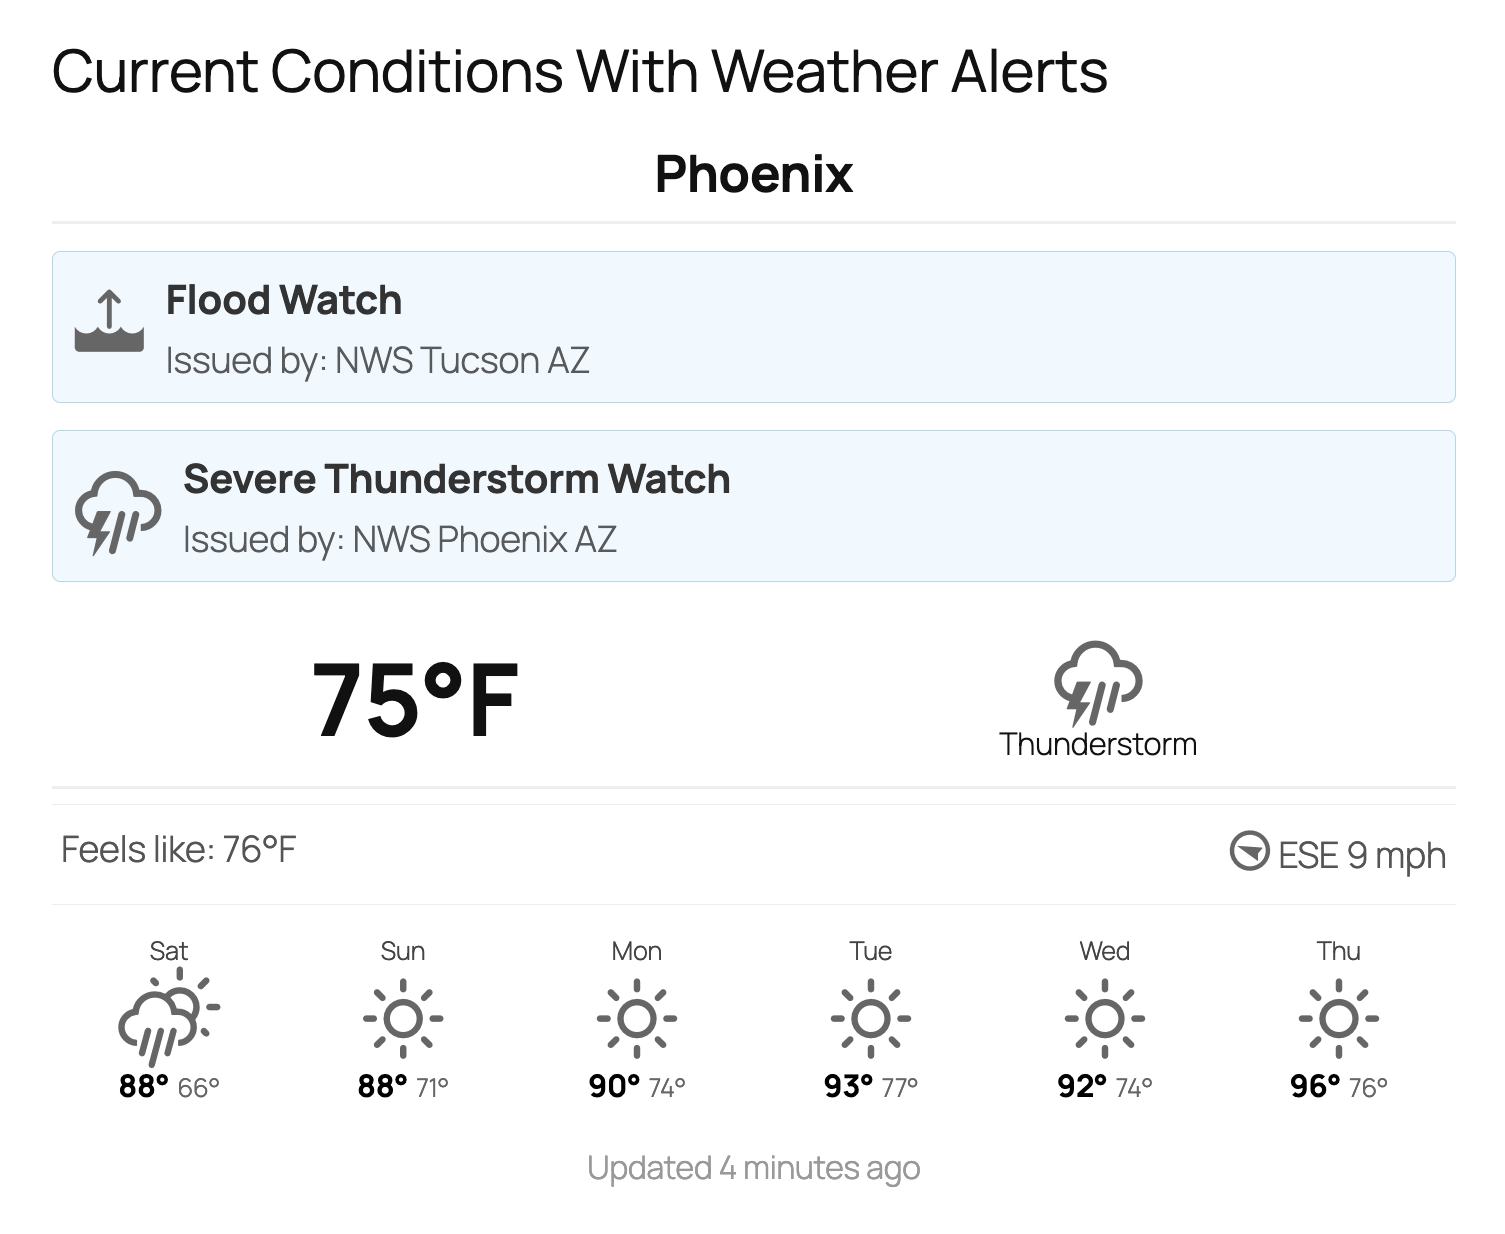
The weather widget with Weather Alerts shown 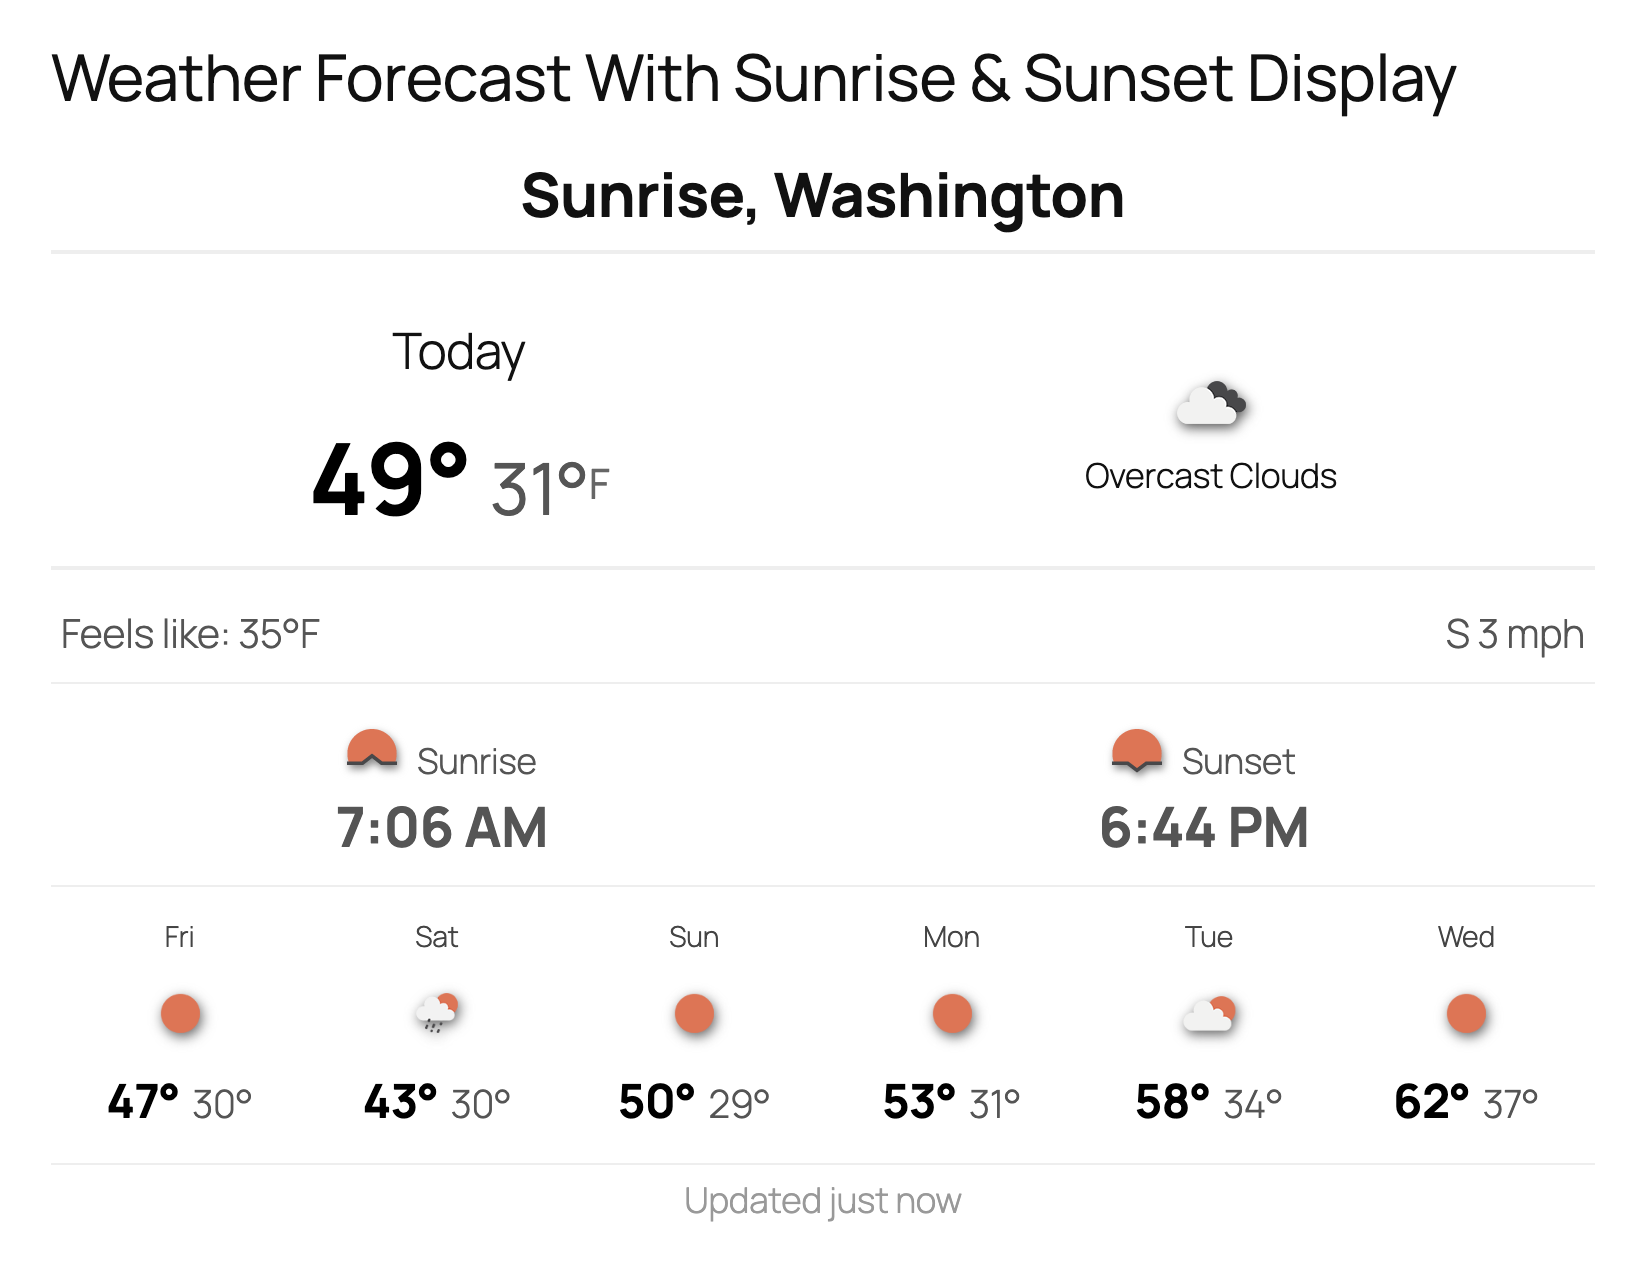
The weather widget with Sunrise and Sunset times shown 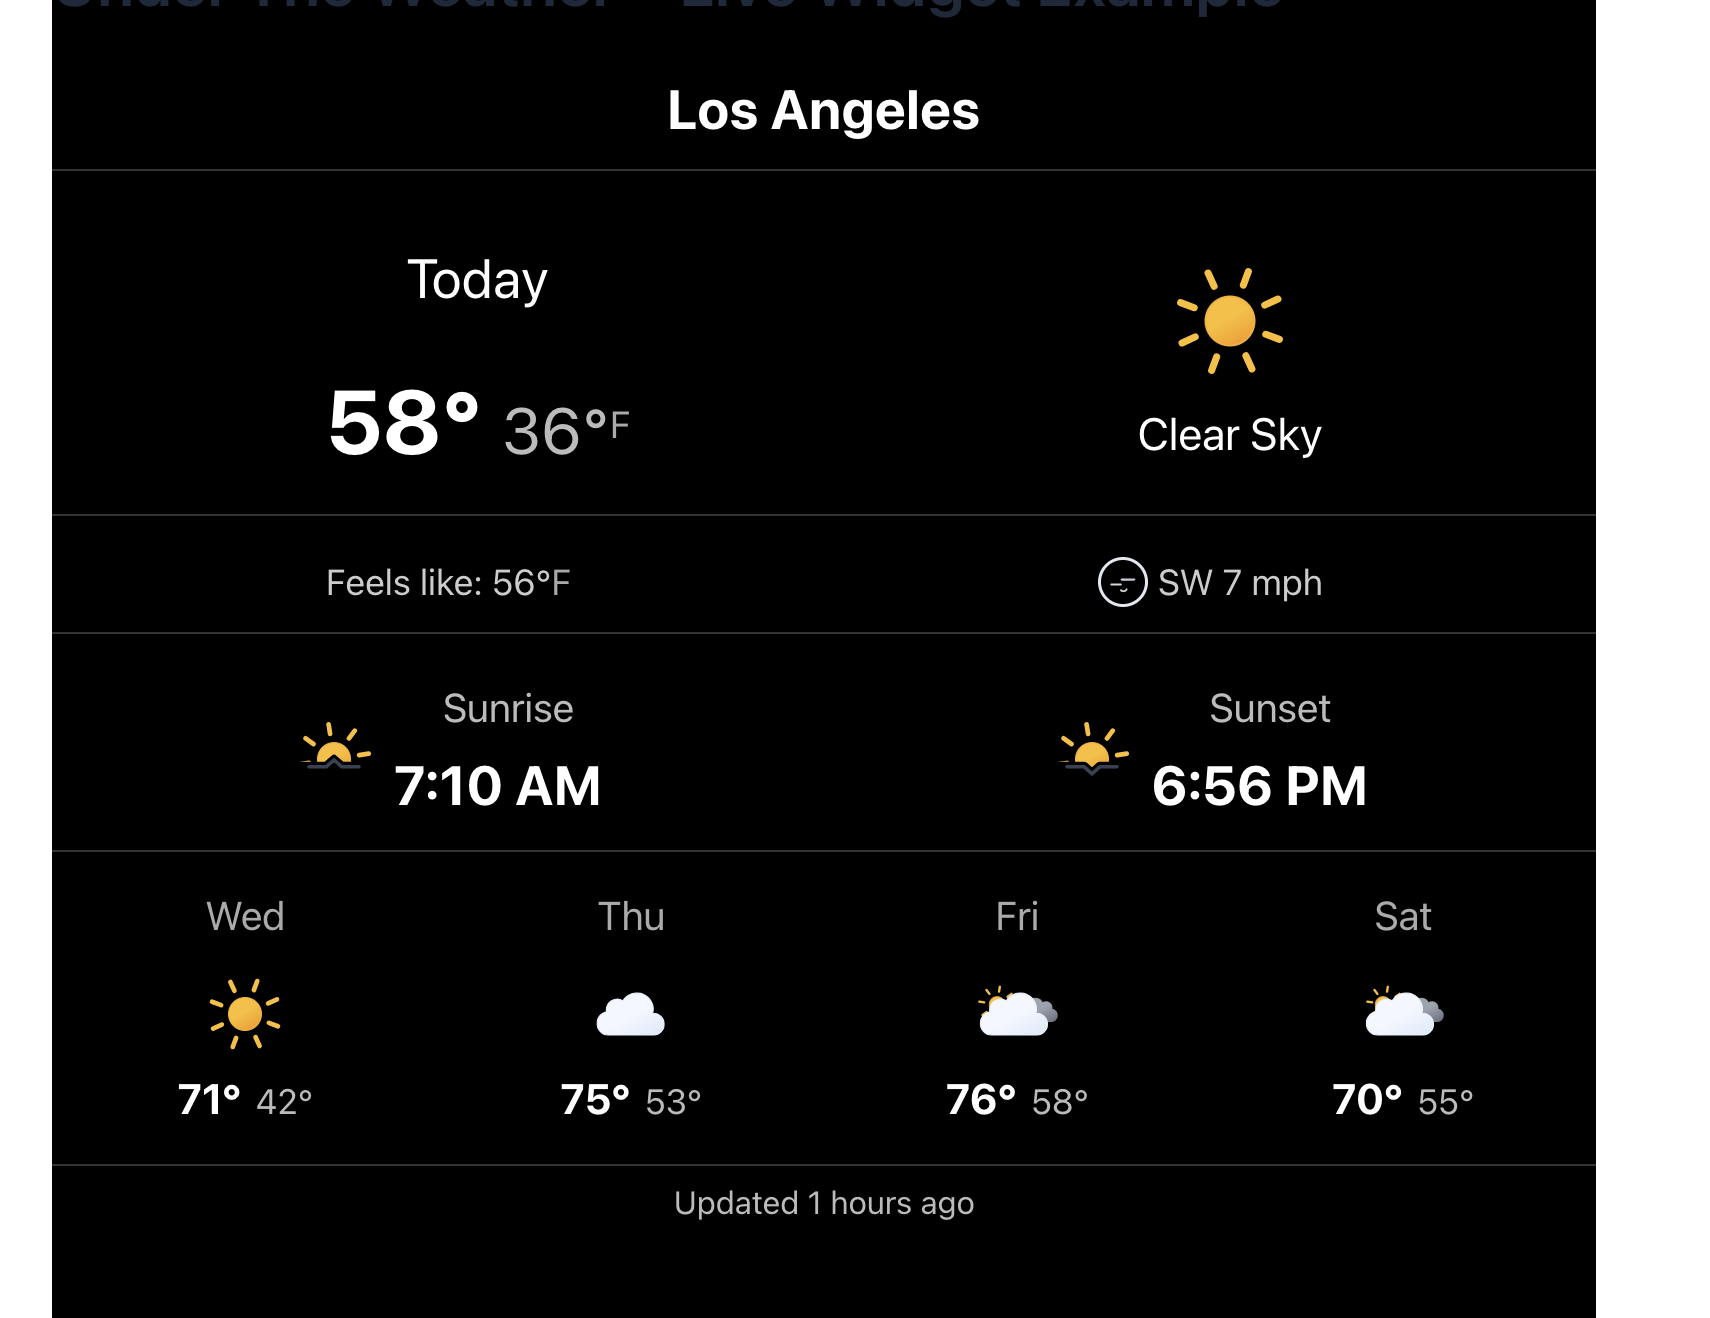
The weather widget in dark mode with Sunrise and Sunset times shown
Blocks
This plugin provides 1 block.
- Under The Weather Forecast Displays a weather forecast for a specific location.
Installation
- Upload the entire
under-the-weatherfolder to the/wp-content/plugins/directory. - Activate the plugin through the ‘Plugins’ menu in WordPress.
- Navigate to Settings > Under The Weather to configure the plugin. You must enter a valid OpenWeather API key for the plugin to function. The plugin is designed to work with the One Call API 3.0. by OpenWeather.
FAQ
-
What API key do I need?
-
This plugin works with the OpenWeather One Call API 3.0. You can get a free API key by signing up on the OpenWeather website. Make sure you have subscribed to the One Call API on your account’s API page.
-
Why do I see “Could not retrieve forecast. Server error?”
-
This most commonly occurs when there is an issue with your OpenWeather API subscription. Please check the following:
1. API Plan: Ensure you have subscribed to the “One Call API 3.0” specifically. Other free plans (like “Current Weather”) are not compatible with this plugin.
2. Payment Info: OpenWeather requires a valid credit card on file for the One Call 3.0 plan. Although the first 1,000 calls per day are free, the API will return an error if no payment method is registered.
3. Activation Time: New API keys can take up to 2 hours to become fully active.
4. Performance Report: Go to Settings > Under The Weather > Performance Report to view the “Raw Data” section for the specific error code (e.g., 401 or 402) returned by the server. -
How can I monitor the number of OpenWeather API calls the plugin makes?
-
Click on the “Performance Report” tab of the Under The Weather Settings Page to see a graph and data log for the last 7 days of plugin performance. The Performance Report shows the last seven days of information about the requests made by the weather widget. The report displays a comparison of the cached hits and calls to the OpenWeather API.
Seeing how the plugin’s cache system reduces the number of API calls demonstrates its effectiveness. Use the Performance Report to examine how modifying the cache expiration time affects the rate of cached requests.
-
Do I need to use the plugin’s caching function?
-
No. To retrieve fresh weather data every time a widget page loads, you can uncheck “Enable Cache” under the plugin’s advanced settings. The caching system greatly reduces API hits, but turning this function off during your initial widget setup may be useful.
-
Will my website ever show yesterday’s weather if I set a long cache time?
-
Cinderella’s magic disappears at midnight and weather caches expire at midnight too. Visitors should never see a cache of the previous day’s forecast.
For example, if you set the cache expiration time to 8 hours and a weather cache is created at 10 p.m. on a Friday (using the weather location’s time), that cache will expire at midnight, and someone visiting the site the next day at 5 a.m. will not see the previous day’s cache even though fewer than 8 hours have passed.
The plugin uses whichever expiration time is shorter to provide the most effective caching. You control the maximum cache duration with the “Cache Expiration Time” slider. However, to ensure your visitors never see yesterday’s weather, the plugin also calculates the time until midnight in the widget’s local timezone. If the time until midnight is shorter than your slider setting, the cache will expire at midnight.
-
The weather isn’t updating. Why?
-
The plugin caches the weather data on your server to improve performance and reduce API calls. The data will only be fetched again after the “Cache Expiration Time” you set on the settings page has passed. If you need to force an immediate update, go to Settings > Under The Weather and click the “Clear All Weather Caches” button.
-
I made changes to my settings. Why isn’t the widget updating?
-
The weather widget is probably displaying a cached forecast. Since waiting around is no fun, the Under The Weather Settings has a “Clear Weather Cache” option at the bottom. If you press the “Clear All Weather Caches & Stats” button, it will force an immediate update of all weather forecasts. This will also clear the performance report data.
If you’re feeling patient, just wait for the weather widget to update after the current cache has expired.
-
Does the Weather Widget work in Fahrenheit or Celsius?
-
Both. By default, the weather widget displays the forecast in Fahrenheit. If you prefer to see the forecast in Celsius, set data-unit=”metric” within the weather-widget div (see configuration instructions). Additionally, checking the “Display Unit Symbol” box on the Under The Weather Settings page instructs the weather widget to display the temperature unit symbol (F or C) in the primary temperature display.
-
What if I don’t know the latitude and longitude for a weather location?
-
The plugin offers two methods for looking up coordinates using its built-in Coordinate Finder tool:
* In the Settings Page: Navigate to Settings > Under The Weather and click the Coordinate Finder tab. Simply type in a location name, and the tool will look up the coordinates and provide you with the exact<div>code to copy and paste.
* In the Editor: While using the Under The Weather Forecast block, click on the Find Coordinates By Name button. The coordinates for your chosen location will be filled in for you automatically. -
How do I use the weather block?
-
In the WordPress block editor, simply search for “Under The Weather Forecast” when adding a new block. The block includes a built-in coordinate finder, so you can search for locations by name rather than manually entering latitude and longitude. Configure your preferences in the block settings sidebar, and the weather will appear automatically on your published page.
-
Can I still use the manual div method if I prefer it?
-
Absolutely! While the block is the user-friendly method for the modern WordPress editor, the plugin fully supports traditional methods for maximum flexibility.
You can use the
[under_the_weather]shortcode to easily place the widget in the Classic Editor, text widgets, or with various page builders.Additionally, the manual
<div>method still works perfectly. It is particularly useful for theme developers who need to integrate the widget directly into template files or dynamically populate its data from custom fields.The traditional method of adding
<div class="weather-widget">with data attributes still works perfectly and is particularly useful for theme developers and sites that dynamically populate widget attributes from post meta or custom fields. -
What coordinate format should I use?
-
The recommended and most reliable format for coordinates is Decimal Degrees (DD), for example:
34.1195,-118.3005.However, the Under The Weather Forecast block is designed to be user-friendly. If you enter coordinates in other common formats like DMS (e.g.,
34°07'10.2"N) or DDM (e.g.,34° 7.17' N), the block will automatically convert them to the correct decimal format for you.For the manual
<div>method, it is strongly recommended to use Decimal Degrees. While the front-end script has a fallback to parse other formats, some characters (like the"symbol in DMS) can break the HTML structure and lead to incorrect coordinates. The block editor’s converter is the most reliable way to handle alternate formats.If you’re unsure what coordinates to use, the Coordinate Finder tool is the best way to retrieve accurate coordinates in the correct format.
-
Where do the weather alerts come from?
-
The alerts are provided directly by the OpenWeather API, which sources them from official meteorological agencies in each country. This ensures the information is timely and authoritative.
-
What is the brief shimmering effect I see before the weather loads?
-
That shimmering animation is a structural placeholder. It instantly reserves the vertical space the weather data will need before the forecast finishes downloading from the server. This prevents the text and images on your page from suddenly jumping down when the widget loads, helping prevent Cumulative Layout Shift (CLS) and protecting your site’s SEO and Core Web Vitals scores.
If you prefer a completely transparent space instead of the animation, you can uncheck the “Shimmer while loading” box in the plugin’s Advanced Settings. Vertical space for the weather data will still be reserved.
-
What does the “Enable Rate Limiting” setting do?
-
This is a security feature that limits the number of times a single visitor (identified by their IP address) can request weather data in one hour. Enabling it helps protect your OpenWeather API key from being overused by automated bots or malicious users. For most websites, the default limit of 100 requests per hour is generous, but you can adjust it if needed.
The rate limit is turned off by default to ensure maximum performance for all users. If you notice an unexpected increase in weather requests in the performance report, go ahead and turn on rate limiting to see if something is afoot.
-
What does the “Async CSS Loading” setting do?
-
This setting (found in Advanced Settings) optimizes how the plugin’s stylesheets are loaded to improve your website’s speed scores (like Google PageSpeed Insights). By loading the CSS asynchronously, the plugin prevents “Render Blocking,” meaning the browser doesn’t pause painting your page to wait for the weather styles to download.
Important Considerations:
* Above the Fold: It is recommended to leave this unchecked if your weather widget is located near the top of the page.
* Layout Shifts: On some sites, async loading can cause a brief “flash of unstyled content” (FOUC) or Cumulative Layout Shift (CLS) where the widget collapses or appears unstyled for a fraction of a second before popping into place.
* The Fix: If you choose to enable async loading, we highly recommend adding a standardmin-heightrule (e.g.,min-height: 300px;) for the.weather-widgetclass to your WordPress theme’s custom CSS. This reserves the widget’s vertical space while the stylesheet downloads in the background.If you still find the loading sequence visually distracting, simply uncheck “Async CSS Loading” to revert to the standard loading method.
-
Can I load the JavaScripts myself?
-
Yes. By default, when “Load Plugin JavaScript” is selected, it will add scripts to every page of your website. If you only plan to display the weather widget on select pages, you could choose to only load the Under The Weather Scripts on those pages by encoding the JavaScript yourself.
When Load Plugin JavaScript is unchecked, you can use this template tag to add the Under The Weather Scripts to your theme’s footer.php file.
        <?php
           if ( function_exists( 'under_the_weather_load_scripts_manually' ) ) {
            under_the_weather_load_scripts_manually();
           }
        ?>
For example, if you only intend to display the weather widget on events pages, you could add this targeted script to your theme’s footer.php file:
        <?php
           // Only load the weather script on single pages of the 'event' post type.
           if ( is_singular('event') && function_exists('under_the_weather_load_scripts_manually') ) {
               under_the_weather_load_scripts_manually();
           }
        ?>
Adding scripts this way is purely optional. Most users can just leave the Load Plugin JavaScript box checked.
-
Are there additional ways to customize this plugin?
-
Yes. You can modify the appearance of the Weather Icons Fonts using CSS. The Weather Icons Fonts are sharp, scalable, and customizable via CSS to match your website’s color palette.
Reviews
Contributors & Developers
“Under The Weather” is open source software. The following people have contributed to this plugin.
ContributorsTranslate “Under The Weather” into your language.
Interested in development?
Browse the code, check out the SVN repository, or subscribe to the development log by RSS.
Changelog
2.7
- NEW: Introduced an admin dashboard widget for a quick, at-a-glance view of daily API and cache usage.
- IMPROVEMENT: Enhanced the Performance Report tab with a new Daily Average pie chart to better visualize caching efficiency.
- Performance: Added a dynamic skeleton UI loader to provide immediate visual feedback while weather data is fetched.
- Performance: Implemented CSS
contain: contentto eliminate Cumulative Layout Shift (CLS) and reduce browser repaints.
2.6
- NEW: Added a “Widget Mode” setting to easily toggle the widget between Light Mode and a new “Dark Mode” theme for better background contrast.
- NEW: Added the ability to set forecast days to “0”, allowing for a highly compact widget that only displays current conditions or today’s forecast.
- IMPROVEMENT: Refined CSS layout and border rendering when the extended forecast is hidden.
2.5
- NEW: Added an “Async CSS Loading” option to the Advanced Settings to eliminate “Render Blocking Resources” and improve PageSpeed Insights scores.
- IMPROVEMENT: Implemented native “Defer” strategy for plugin JavaScript (requires WP 6.3+), ensuring scripts do not block page rendering.
- IMPROVEMENT: Added smart preloading for the “Weather Icons” font file to prevent “Critical Request Chain” penalties and improve load times.
- IMPROVEMENT: The “Async CSS” and “JS Defer” strategies are now enabled by default for new installations to ensure maximum performance out of the box.
Review the changelog.txt for previous changes.